Deploying with kubectl
Deploy a workload with kubectl — Pods, Deployments, Services, scaling, rolling updates — using a UBI nginx image.
This is the first section that actually deploys a workload. §1-§5 got you a cluster you can talk to; §6 puts something useful inside it. The example is deliberately small — one UBI nginx Deployment and a Service — so the moving parts each get attention rather than getting lost in a more realistic application.
By the end you’ll have written a Deployment manifest, applied it, watched the Pods come up, exposed them through a Service, reached the Service from your host, scaled the Deployment up and down, and rolled out a new image version. Same vocabulary you’ll use for every real workload after this.
Commands in this chapter assume the minikube kubectl context that
§4 creates. Run kubectl config use-context minikube once if another
context is current; the demo script pins it for you.
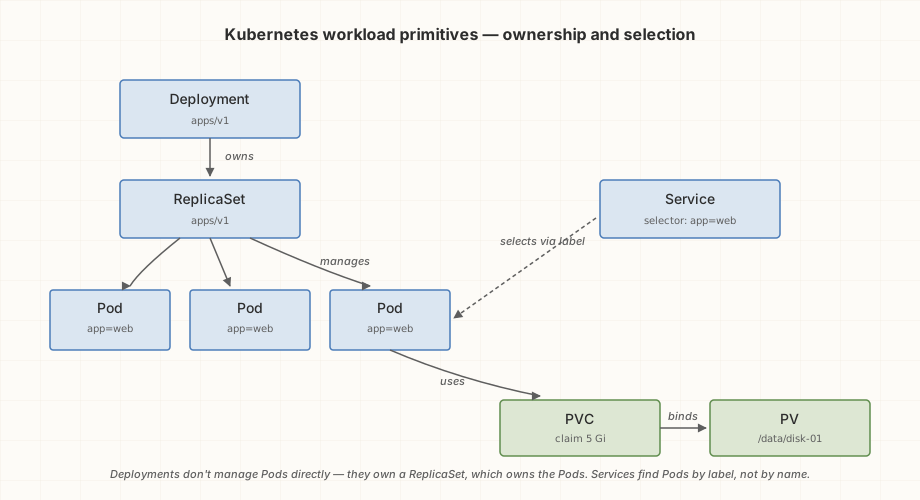
The mental model: Pods, ReplicaSets, Deployments
Three Kubernetes objects work together to run your workload. Each abstracts over the next.
A Pod is the smallest deployable unit — one or more containers that share a network namespace and lifecycle. Pods are near-disposable; if one dies, it stays dead unless something else recreates it.
A ReplicaSet is the thing that recreates Pods. It holds a target replica count and a Pod template; if there are fewer Pods than the count, it creates more. You’ll rarely write ReplicaSets directly — they exist mostly as the implementation underneath Deployments.
A Deployment wraps a ReplicaSet with lifecycle management. Deployments handle rolling updates, rollbacks, history. You write Deployments and almost never write Pods or ReplicaSets directly. Deployments are the natural unit of “a running thing in my cluster”.
Visually:
Deployment
  └─ controls → ReplicaSet
                  └─ controls → Pod, Pod, Pod (replicas)
When you change the Deployment (new image, new env var), it creates a new ReplicaSet with the new template, scales the new one up, scales the old one down. The old ReplicaSet sticks around at zero replicas so you can roll back to it.
A small detour: building our own image
The Red Hat UBI ecosystem ships application images like
registry.access.redhat.com/ubi10/nginx-126 — but those are
s2i (source-to-image) builder images designed for the OpenShift
workflow. Their default CMD is /usr/libexec/s2i/run, which expects
content baked in at build time via s2i assemble. In plain
Kubernetes (rather than OpenShift) they crashloop because nginx
starts with nothing to serve.
The right answer isn’t to coax the s2i image into running directly. It’s to build our own image from a standard UBI base.
Why multi-stage
The Containerfile in
examples/06-deploy-nginx-kubectl/Containerfile is a two-stage
build:
- Builder stage:
registry.access.redhat.com/ubi10/ubi— the full UBI 10 image. In a real project this is where you’d run a static-site generator, compile assets, run package managers — anything that needs a full toolchain - Runtime stage:
registry.access.redhat.com/ubi10/ubi-minimal— a stripped-down UBI 10 withmicrodnf(the slim package manager). Just what nginx needs to run, nothing extra
The runtime image inherits nothing from the builder except what we
explicitly COPY --from=builder. Build-time tooling — compilers,
build dependencies, transient files — never reach the deployable
image.
For our static-content nginx example the builder stage is intentionally minimal (it just stages the index.html). For a production workload where the builder runs Hugo or Webpack or a Maven build, the pattern shows its real value: a tiny, focused runtime image and a build environment with whatever tools you need.
Why ubi-minimal specifically
Three Red Hat UBI variants are commonly chosen as runtime bases:
| Image | When |
|---|---|
ubi10/ubi |
Full UBI 10 — pick when you need many packages or rich shell tooling at runtime |
ubi10/ubi-minimal |
UBI 10 with microdnf instead of dnf. Smaller; great for single-app runtime images |
ubi10/ubi-micro |
Strictly distroless — no package manager. Build packages in another stage, then COPY in |
We use ubi10/ubi-minimal for the runtime: small enough to be a
real “minimal runtime”, but with microdnf available so the
Containerfile is simple. All three are freely redistributable;
none require subscription-manager registration. (That’s the
hallmark of UBI vs full RHEL container images — the latter need
registration to install packages.)
The Containerfile
# ── Stage 1: Builder ─────────────────────────────────────────────────────
FROM registry.access.redhat.com/ubi10/ubi:10.2-1791444044 AS builder

WORKDIR /build

# In a real project, you'd RUN a static-site generator here. For
# this tutorial the builder just stages the hand-written index.html
# so the COPY --from=builder in stage 2 has something to take.
COPY index.html .

# ── Stage 2: Runtime ─────────────────────────────────────────────────────
FROM registry.access.redhat.com/ubi10/ubi-minimal:10.2-1791444377

# Install nginx, clean caches in the same layer
RUN microdnf install -y nginx && \
    microdnf clean all && \
    rm -rf /var/cache/dnf /var/cache/yum

# Replace the package's default nginx.conf with our minimal one (see
# next subsection)
COPY nginx.conf /etc/nginx/nginx.conf

# Copy the staged content from the builder stage
COPY --from=builder /build/index.html /usr/share/nginx/html/index.html

# Document root readable by any UID (already world-readable at 755;
# belt-and-suspenders)
RUN chmod -R a+rX /usr/share/nginx/html

USER 1001:0
EXPOSE 8080
CMD ["nginx", "-g", "daemon off;"]
A few notes on the rationale:
COPY --from=builderinstead ofRUN-to-manipulate — when a runtime image is more minimal than the builder (or fully distroless like UBI Micro), there may be no/bin/shforRUNto invoke. Always-COPYis a robust habitCOPY nginx.confoverrides the package’s default — see the next subsection for why we ship our own. Briefly: the default RHEL nginx config logs to files under/var/log/nginxthatkubectl logscan’t see, uses/run/nginx.pid(root-only), and has auser nginx;directive that warns when running as non-rootUSER 1001:0— UID 1001 with explicit GID 0. The:0part matters: a bareUSER 1001may result in GID 1001 (depending on the runtime’s handling of UIDs absent from/etc/passwd), which breaks any group-0 permission scheme. OpenShift’s pattern is “any UID, always GID 0”, and1001:0is the plain-Kubernetes equivalent
Why we ship our own nginx.conf
The default /etc/nginx/nginx.conf from the RHEL/UBI nginx package
needs three changes for a container running as non-root with Pods
that kubectl logs can introspect:
- Logs to stdout/stderr, not files. Default RHEL nginx writes
access.loganderror.logunder/var/log/nginx/. Those files exist inside the container’s filesystem;kubectl logsonly reads container stdout/stderr. When something goes wrong at runtime — a port-bind permission denied, a worker crash — the error message lands in a file you can’t see, and the Pod crash-loops with no obvious cause - PID file in
/tmp, not/run. Default is/run/nginx.pidwhich is only writable as root - Drop the
userdirective. The default hasuser nginx;to drop privileges from root to thenginxuser after binding port 80. When we’re already running as USER 1001, the directive does nothing useful and nginx warns about it on startup
examples/06-deploy-nginx-kubectl/nginx.conf makes those three
fixes and a fourth: it points all *_temp_path directives at
/tmp/nginx-*. nginx allocates these temp dirs on startup
regardless of whether your workload uses them — for buffering
large request bodies, proxy responses, FastCGI responses, etc. The
defaults reference /var/lib/nginx/tmp/* which our non-root user
can’t write. Pointing them at /tmp removes the dependency on
/var/lib/nginx entirely.
worker_processes  auto;
error_log         /dev/stderr  warn;
pid               /tmp/nginx.pid;

events {
    worker_connections  1024;
}

http {
    include            /etc/nginx/mime.types;
    default_type       application/octet-stream;
    access_log         /dev/stdout;
    sendfile           on;
    keepalive_timeout  65;

    client_body_temp_path  /tmp/nginx-client-body;
    proxy_temp_path        /tmp/nginx-proxy;
    fastcgi_temp_path      /tmp/nginx-fastcgi;
    uwsgi_temp_path        /tmp/nginx-uwsgi;
    scgi_temp_path         /tmp/nginx-scgi;

    server {
        listen       8080  default_server;
        listen       [::]:8080  default_server;
        server_name  _;
        root         /usr/share/nginx/html;

        location / {
            index  index.html;
        }
    }
}
Same shape as the package default, just rewritten to be friendly to
non-root operation and to kubectl logs. Worth saving as a starting
point for your own containerized nginx deployments — the principles
generalize.
Building and loading the image
minikube’s node is a container with its own containerd, so an image
built on the host is not visible to the cluster until you load it.
Build with Docker Engine, then load into the minikube profile:
cd examples/06-deploy-nginx-kubectl
docker build -f Containerfile -t nginx-custom:v1 .
minikube -p minikube image load nginx-custom:v1
No registry push, no docker save plumbing. minikube -p minikube
image build -t nginx-custom:v1 -f Containerfile . builds inside the
node instead and skips the load step; the demo uses the host build
because it reuses Docker’s layer cache.
Confirm with:
minikube -p minikube image ls | grep nginx-custom
To remove a stale copy:
minikube -p minikube image rm nginx-custom:v1
A note on SELinux
Fedora and RHEL hosts run SELinux in enforcing mode. It matters
whenever a container bind-mounts a host directory: the directory needs
a container-readable label (Docker spells that :z or :Z on the
-v flag). This example does not bind-mount anything from the host
because index.html is baked into the image, so there is nothing to
relabel here. The one place later chapters touch host paths is
minikube’s own hostPath storage, which lives inside the node
container; §8 covers it.
Writing a Deployment manifest
With the image built and tagged, the Deployment is straightforward — just point at the image:
apiVersion: apps/v1
kind: Deployment
metadata:
  name: nginx
  labels:
    app: nginx
spec:
  replicas: 2
  selector:
    matchLabels:
      app: nginx
  template:
    metadata:
      labels:
        app: nginx
    spec:
      containers:
      - name: nginx
        image: nginx-custom:v1
        # Built with docker and loaded into the cluster by
        # build_and_load in demo.sh — it's not in any registry, so
        # never pull.
        imagePullPolicy: Never
        ports:
        - containerPort: 8080
        readinessProbe:
          httpGet:
            path: /
            port: 8080
          initialDelaySeconds: 2
          periodSeconds: 5
        livenessProbe:
          httpGet:
            path: /
            port: 8080
          initialDelaySeconds: 10
          periodSeconds: 10
        resources:
          requests:
            cpu: "100m"
            memory: "64Mi"
          limits:
            cpu: "500m"
            memory: "256Mi"
Reading it top to bottom:
apiVersion: apps/v1— Deployments live in theappsAPI group at versionv1. (Pods are inv1core; the API group matters when you reference these objects via the API server)kind: Deployment— the resource typemetadata.name: nginx— the object’s name, unique within its namespacespec.replicas: 2— target replica countspec.selector.matchLabels— which Pods this Deployment manages. Must matchtemplate.metadata.labelsexactly or the Deployment refuses to applyspec.template— the Pod template. Everything from here on describes the Pods this Deployment createstemplate.spec.containers[].image—nginx-custom:v1, the image we just built. Not in any registry; only in the cluster’s local image cacheimagePullPolicy: Never— never contact a registry; use only the image loaded into the node. The image exists nowhere else, so a pull attempt could only fail. If the load step was skipped, the Pod fails fast withErrImageNeverPullinstead of hanging on a pullcontainerPort: 8080— declares the port the container listens on (matching the nginx config we baked in)readinessProbe— when to consider the Pod ready for traffic. Failing readiness pulls the Pod out of Service endpoints but doesn’t restart itlivenessProbe— when to consider the Pod broken and restart it. Failing liveness triggers a container restartresources.requests/limits— minimum guaranteed resources for scheduling, and a cap on usage. CPU is throttled at the limit; memory above the limit triggers OOM-kill
The labels are how everything in Kubernetes finds everything else.
Labels and selectors
app: nginx appears in three places in the Deployment manifest:
metadata.labelson the Deployment (so other resources can find this Deployment)spec.selector.matchLabels(which Pods this Deployment controls)spec.template.metadata.labels(the label on each Pod the Deployment creates)
(2) and (3) must match. (1) is independent but conventional to
keep the same. The Service we’ll create in a moment will also use
app: nginx in its selector to find these Pods.
Applying the manifest
kubectl apply -f examples/06-deploy-nginx-kubectl/manifests/deployment.yaml
apply is idempotent — running it twice with the same file makes
no changes the second time. It’s the standard way to ship
manifests in tutorials and CI.
You’ll see:
deployment.apps/nginx created
The Deployment is created; Kubernetes now races to make reality match the spec.
Inspecting
kubectl get deployment nginx
NAME    READY   UP-TO-DATE   AVAILABLE   AGE
nginx   2/2     2            2           30s
2/2 means 2 ready out of 2 desired. kubectl get pods:
kubectl get pods -l app=nginx
You should see two Pods named nginx-<replicaset-hash>-<pod-hash>,
both Running and 1/1 (one container ready per Pod).
For deeper inspection:
kubectl describe deployment nginx     # events, conditions, history
kubectl describe pod <pod-name>       # the same for a specific Pod
kubectl logs <pod-name>               # container stdout/stderr
kubectl logs -l app=nginx --tail=20   # logs from all Pods with that label
To get a shell inside a Pod:
kubectl exec -it <pod-name> -- /bin/sh
(The ubi-minimal runtime image has /bin/sh; slimmer images may have
no shell at all. -- separates kubectl’s flags from the command to
run in the container.)
Exposing it with a Service
Pods are ephemeral — restarts mean new IPs. A Service gives
the Deployment a stable address. Here’s
examples/06-deploy-nginx-kubectl/manifests/service.yaml:
apiVersion: v1
kind: Service
metadata:
  name: nginx
  labels:
    app: nginx
spec:
  type: NodePort
  selector:
    app: nginx
  ports:
  - port: 80
    targetPort: 8080
    # Published to 127.0.0.1:18080 when the minikube profile is created
    # (--ports=127.0.0.1:18080:30080). Shared slot with §8, §9, §12-http.
    nodePort: 30080
    protocol: TCP
The Service:
- Has its own name (
nginx) and cluster IP, both stable for the Service’s lifetime - Has a selector that matches all Pods with
app: nginx— exactly the Pods our Deployment manages - Receives traffic on
port: 80and forwards totargetPort: 8080on the matching Pods - Is type
NodePort: it also listens on port 30080 of the node. Theminikubeprofile publishes that port to127.0.0.1:18080on your host, so no helper process is needed. §7 explains the mechanism
Apply:
kubectl apply -f examples/06-deploy-nginx-kubectl/manifests/service.yaml
kubectl get service nginx
NAME    TYPE       CLUSTER-IP      EXTERNAL-IP   PORT(S)        AGE
nginx   NodePort   10.96.123.234   <none>        80:30080/TCP   5s
EXTERNAL-IP stays <none> for NodePort; the external path is the
node port, 80:30080 in the PORT(S) column.
Reaching the Service from your host
curl http://127.0.0.1:18080/
You should see the baked-in page, with “Test Page for nginx on UBI 10
Minimal” in the title. If the connection is refused, check
docker port minikube 30080/tcp: an empty answer means the profile
was created without --ports and must be recreated (§4, §7).
Only one Service can hold nodePort 30080 at a time. §8 and §9 reuse the same slot, so delete this Service (see Cleanup) before moving on.
Scaling
The Deployment’s replica count is just a number. Bump it:
kubectl scale deployment nginx --replicas=5
kubectl get pods -l app=nginx
You should see five Pods now. The Service automatically picks up
the new endpoints — kubectl get endpoints nginx would show five
IPs.
Scale back down:
kubectl scale deployment nginx --replicas=2
The two oldest Pods stay; the three new ones are terminated.
To make a replica count change permanent, edit the manifest’s
spec.replicas and kubectl apply again — that way the next
person to deploy from your manifest gets the same count.
Rolling updates
Change the image:
kubectl set image deployment/nginx nginx=nginx-custom:v2
(Build and load a nginx-custom:v2 first, for example after editing
index.html: docker build -t nginx-custom:v2 . then
minikube -p minikube image load nginx-custom:v2. Always set an
explicit tag; imagePullPolicy: Never plus a fresh tag is what makes
the rollout pick up the new image.)
Watch the rollout:
kubectl rollout status deployment/nginx
You’ll see lines like:
Waiting for deployment "nginx" rollout to finish: 1 out of 2 new replicas have been updated...
Waiting for deployment "nginx" rollout to finish: 1 out of 2 new replicas have been updated...
Waiting for deployment "nginx" rollout to finish: 1 old replicas are pending termination...
deployment "nginx" successfully rolled out
While it’s rolling, kubectl get pods -l app=nginx shows a mix
of old and new (the new Pods starting up) and new (already running).
The Deployment manages this by creating a new ReplicaSet,
scaling it up while scaling the old one down — slowly enough
that traffic is never dropped.
To see the rollout history:
kubectl rollout history deployment/nginx
REVISION  CHANGE-CAUSE
1         <none>
2         <none>
To roll back:
kubectl rollout undo deployment/nginx
This restores the previous ReplicaSet’s image and scales it back up — the rollback is itself a rolling update.
Cleanup
kubectl delete -f examples/06-deploy-nginx-kubectl/manifests/
This deletes the Deployment (which deletes its ReplicaSets, which delete their Pods) and the Service. Idempotent.
To delete everything in a namespace by label without needing the manifests:
kubectl delete all -l app=nginx
kubectl delete all doesn’t actually delete all resource kinds
— it covers the workload-shaped ones (Deployment, Service, Pod,
ReplicaSet, StatefulSet, DaemonSet, Job, CronJob). ConfigMaps,
Secrets, PVCs, and others need explicit delete <kind>.
Verification: examples/06-deploy-nginx-kubectl/
examples/06-deploy-nginx-kubectl/demo.sh runs the prose above
as one end-to-end test:
- Pre-flight: checks Docker Engine, ensures the
minikubeprofile exists with its published ports, pins the kubectl context, clears any prior nginx Deployment/Service, and checks nodePort 30080 is free - Builds the
nginx-custom:v1image withdocker build, then loads it withminikube -p minikube image load - Applies both manifests
- Waits for the Deployment to be
Available(and dumps pod logs from current and previous containers on timeout, so failures self-diagnose) - Confirms
docker port minikube 30080/tcpshows 127.0.0.1:18080 - Waits for
http://127.0.0.1:18080/, curls it, checks for the sentinel string from our baked-in index.html - Scales to 3 replicas; verifies all three become Ready
- Deletes the manifests on exit (
trap), freeing nodePort 30080; leaves the built image in the cache for fast re-runs
Run it:
cd examples/06-deploy-nginx-kubectl
./demo.sh
Expected duration: 2-4 minutes first run (downloads two UBI base
images and runs microdnf install nginx); 25-40 seconds after
(image cached).
The demo uses your default minikube cluster (not a separate
profile, unlike examples/03-driver-check/). It cleans up its
own Deployment/Service but leaves the cluster running and the
built image cached for the next demo.