Starting minikube
Start a minikube cluster with the docker driver and containerd, publish NodePorts to loopback, verify it's healthy, manage its lifecycle.
This section starts your first minikube cluster, walks through the layers involved (Docker Engine, the in-cluster runtime, the cluster itself), publishes the NodePorts later sections use, and covers the lifecycle commands you’ll use day to day: status, pause, stop, delete, upgrade.
At the end of the section, examples/03-driver-check/demo.sh
runs the whole thing as a strict end-to-end script — same
commands the prose walks through, packaged as a smoke test.
This section assumes §2 is complete (minikube, kubectl, and the
supporting tools are on PATH).
Start the cluster
Pass everything on the command line. Do not use minikube
config set for the driver or runtime: it writes
~/.minikube/config/config.json, which every minikube project on
the machine shares, so one project’s choice silently changes
another’s.
minikube start \
    --driver=docker --container-runtime=containerd \
    --kubernetes-version=v1.36.5 \
    --cpus=6 --memory=16384 \
    --ports=127.0.0.1:18080:30080,127.0.0.1:18081:30808,127.0.0.1:18090:30900
The values come from the §1 hardware table (6 CPUs and 16 GB is the
“comfortable for most of the tutorial” pick) and match what the
example demos pass when they create the minikube profile.
The first run downloads minikube’s “kicbase” image (the node image
with kubeadm preinstalled) and starts a Docker container named
minikube, then bootstraps a single-node Kubernetes v1.36.5
cluster inside it. Expect 60–90 seconds for the first run; 15–30
seconds for restarts thereafter.
You’ll see output like:
😄  minikube v1.39.0 on Fedora 44
✨  Using the docker driver based on user configuration
👍  Starting "minikube" primary control-plane node in "minikube" cluster
🚜  Pulling base image ...
💾  Downloading Kubernetes v1.36.5 preload ...
🔥  Creating docker container (CPUs=6, Memory=16384MB) ...
📦  Preparing Kubernetes v1.36.5 on containerd ...
🔗  Configuring CNI (Container Networking Interface) ...
🔎  Verifying Kubernetes components...
🌟  Enabled addons: storage-provisioner, default-storageclass
🏄  Done! kubectl is now configured to use "minikube" cluster
The last line is the important one — minikube has updated your
~/.kube/config so kubectl points at the cluster you just
started. Exact wording varies between minikube releases.
The published ports
--ports publishes the node container’s NodePorts on your
loopback interface. Each entry is 127.0.0.1:<host port>:<nodePort>.
The three used by the core sections:
| Host address | nodePort | Used by |
|---|---|---|
127.0.0.1:18080 |
30080 | §6 nginx; §8 and §9 reuse it one at a time; §12 HTTP add-on interceptor |
127.0.0.1:18081 |
30808 | §7 nginx-np |
127.0.0.1:18090 |
30900 | §5 dashboard, through the dashboard-host companion Service |
A Service of type: NodePort with one of those nodePort values
is then reachable at the matching host address, for example
curl http://127.0.0.1:18080/. Loopback only means nothing on your
network can reach it. No process has to stay running in a
terminal for these to work.
The §11 Istio profile has its own map of five ports, set in §11.
Published ports are fixed at creation
Docker cannot add a published port to a running container, and minikube sets the mapping only when it creates the node. So:
- Ports persist across
minikube stop/minikube start - Adding or changing one means
minikube deleteand a newminikube startwith the full--portslist - A host port can be published by only one running profile at a time (§4)
Check what a profile publishes:
docker port minikube
30080/tcp -> 127.0.0.1:18080
30808/tcp -> 127.0.0.1:18081
30900/tcp -> 127.0.0.1:18090
Ask for one nodePort to see just its mapping:
docker port minikube 30080/tcp
If a demo reports that a profile “does not publish nodePort …”, it is telling you the profile was created without that mapping. It prints the delete-and-recreate command; it never runs it for you.
What just happened
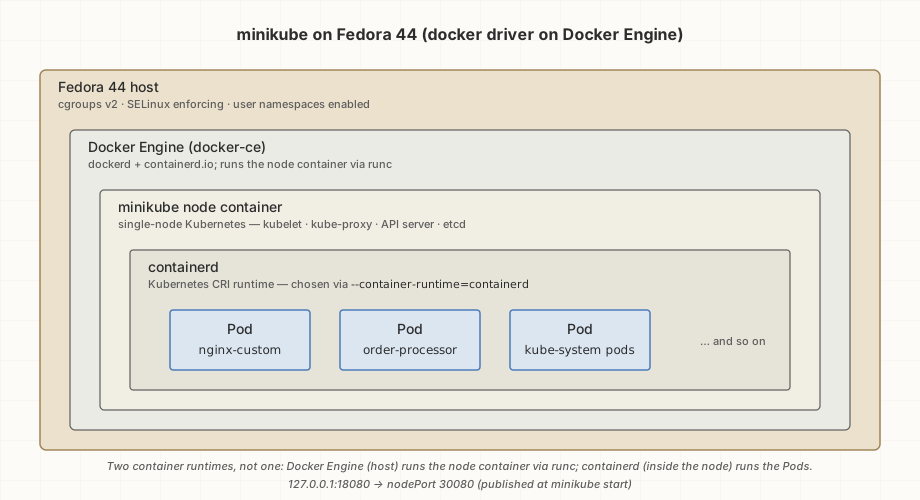
Three layers stacked up:
| Layer | Implementation | Inspect with |
|---|---|---|
| Host container engine | Docker Engine (docker-ce; containerd.io and runc) |
docker ps (shows the minikube container) |
| In-cluster container runtime | containerd with runc, inside the node container | minikube ssh -- sudo crictl info |
| Kubernetes itself | One node running kubelet + control plane | kubectl get nodes |
Docker Engine, through its own containerd and runc, runs the
node container. Inside that container a second containerd with
runc runs your pods, and the kubelet drives it over CRI. Most
readers don’t need to think about the bottom two layers much —
they’re the implementation. What matters day to day is that
kubectl talks to a working Kubernetes cluster and that your
NodePorts answer on 127.0.0.1.
Verify the cluster
Three sanity checks:
minikube status
You should see all four components Running:
minikube
type: Control Plane
host: Running
kubelet: Running
apiserver: Running
kubeconfig: Configured
Then via kubectl:
kubectl --context minikube get nodes
NAME       STATUS   ROLES           AGE   VERSION
minikube   Ready    control-plane   30s   v1.36.5
And the system pods that make the cluster work:
kubectl --context minikube get pods -A
You should see pods in the kube-system namespace (etcd,
kube-apiserver, kube-scheduler, kube-controller-manager,
coredns, storage-provisioner, kube-proxy) all in
Running state.
If anything’s not Running, give it 30 seconds and retry —
control-plane pods sometimes take a moment to settle after the
node first reports Ready.
Drivers (briefly)
The start command above uses --driver=docker; here’s what other
options exist and when you’d reach for them.
| Driver | When |
|---|---|
| docker | Used by this tutorial. Runs the kicbase node as a container under Docker Engine; no virtualization required |
kvm2 |
Runs a full VM via libvirt/KVM. Slower start, full isolation. Needs libvirtd configured |
qemu |
Like kvm2 but without KVM acceleration. Mainly for unusual configurations |
None of the examples support the VM drivers. Why the podman driver left this tutorial is in LESSONS-LEARNED, Part 4.
In-cluster container runtime
Separate from the driver is the container runtime inside the
cluster — what the kubelet uses to run Pods. This tutorial uses
containerd with runc, selected with
--container-runtime=containerd. Pass it explicitly on every
minikube start that creates a profile; the examples do.
Three independent choices, easy to conflate:
| Layer | Used here |
|---|---|
| Host container engine | Docker Engine (docker-ce) |
| minikube driver | --driver=docker |
| In-cluster container runtime | --container-runtime=containerd (runc) |
The first two are about the host’s relationship with minikube.
The third is what the kubelet uses inside the cluster to run
Pods — independent of the first two. Docker Engine on the host
and containerd in the node never share state: an image you
docker build on the host is not visible to the cluster until you
load it (minikube image load), which §6 shows.
A note on docker-as-runtime in modern Kubernetes
Docker as the in-cluster runtime has been deprecated since
Kubernetes 1.24 (2022) — that release removed the dockershim that
had bridged the kubelet’s CRI interface to Docker’s non-CRI
socket. minikube’s --container-runtime=docker still works, but
it routes through cri-dockerd, an external shim that adds
moving parts without buying you anything for tutorial-scale work.
There’s no reason to prefer docker over containerd as an
in-cluster runtime today.
Cluster lifecycle
You’ll use these constantly.
Pause and unpause
Suspend the cluster without shutting it down:
minikube pause
minikube unpause
pause keeps your workloads loaded but freezes their processes.
Useful when you want to free CPU/memory temporarily without
losing state. Unpausing resumes everything from the same place.
Stop and start
A heavier suspend; cleanly shuts down the cluster:
minikube stop
minikube start
stop terminates the cluster’s container; start (without
re-creating anything) brings it back. Persistent volumes, loaded
workloads, and the published ports survive stop/start.
Delete
A full reset — removes the cluster, the container, and the persistent state:
minikube delete
You’ll want this after experiments, or when an upgrade is in order, or if the cluster gets wedged. Recovery is fast: run the start command from the next section again and you have a fresh cluster. Delete the profile and recreate it whenever you need a port that isn’t published yet.
Upgrading minikube
Since §2 installed minikube via dnf (from the upstream RPM), the upgrade is the standard dnf path:
sudo dnf upgrade -y minikube
minikube version
Check for new versions without applying:
minikube update-check
If you’ve been running an older cluster across an upgrade, delete the profile and run the §3 start command again; that is usually the cleanest way to migrate to the new minikube version’s defaults.
Smoke test: examples/03-driver-check/
The examples/03-driver-check/demo.sh script runs the whole
sequence above as one end-to-end test:
- Checks Docker Engine (
require_docker_engine): thedefaultcontext onunix:///var/run/docker.sock,DOCKER_HOSTunset, nopodman-docker - Starts a minikube cluster on a
driver-checkprofile with--driver=docker --container-runtime=containerdand--ports=127.0.0.1:18079:30079(so it doesn’t disturb your default cluster or its ports) - Verifies the profile reports driver
dockerand runtimecontainerd, the node reportscontainerd://..., anddocker port driver-check 30079/tcpshows127.0.0.1:18079 - Verifies
minikube statusis fullyRunning - Verifies
kubectl --context driver-checkcan list nodes and system pods - Tears down the profile on exit (even on failure, via
trap)
Run it:
cd examples/03-driver-check
./demo.sh
Expected duration: 60–90 seconds first run, 30–45 seconds after.
You should see a ✓ SUCCESS line at the end.
If anything fails, the script leaves the profile around for
inspection — minikube logs -p driver-check and
kubectl --context driver-check get events -A --sort-by='.lastTimestamp'
are the first two things to look at.